
Let’s make the first Rust Actix Web Server on Raspberry pi by following the steps below, Please follow every single step one by one so you should not get any error
Installation and Flashing the Raspbian OS into USB Flash Drive.
- Download Raspbian x86 Desktop image here.
- Download balenaEtcher here.
- Now burn the Raspbian x86 desktop image you just downloaded into USB flash drive using balenaEtcher.
- Now insert this USB flash drive on your another spare PC/Laptop which you want to use as alternate of raspberypi.
- And follow the onscreen instructions.
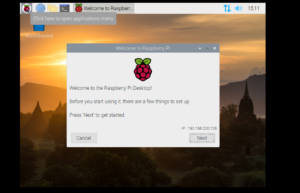
- Then you will see the following welcome screen. You have successfully installed Raspbian OS.
Configuration
Now make two files here.
- Name First file as wpa_supplicant.txt and add the following details
ctrl_interface=DIR=/var/run/wpa_supplicant GROUP=netdev
update_config=1
country=US

network={
	ssid="Your network SSID"
	psk="Your WPA/WPA2 security key"
	key_mgmt=WPA-PSK
}
now save it and then rename it as wpa_supplicant.conf.
2. Create another file with no extension and name it as ssh.
To make a headless connection of your Raspberypi (Pc/laptop)W with PC you need to know the IP address of your Pi on your local network. Make sure your PC and Pi are on the same network.
Now you have to run the following commands on your pi.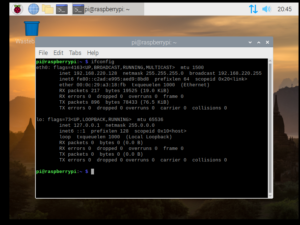
$ ifconfig //lets suppose it gives 192.168.0.1

$ sudo apt-get install nmap

$ sudo nmap -sP 192.168.0.0/24
// Install Rust on your pi
curl --proto '=https' --tlsv1.2 -sSf https://sh.rustup.rs | sh
// verify the installation
$ rustc --version
$ rustup --version
You must have rustup version 1.39.0 or higher.
In case you want to update -> $ rustup update
Building a Simple Rust Actix Web Server on your Pi:

Learn Rust Actix Offcial Documentation here
Let’s Make a new rust project by cargo new index
index/cargo.toml
[dependencies]

actix-web =”2.0"

actix-rt = “1.0”
index/src/main.rs
use actix_web:: {web, App, HttpResponse, HttpServer, Responder};

use std::io;

async fn index() -> impl Responder {

HttpResponse::Ok().body(“Hello World!,This is the first server made in Actix”)

}

use actix_web::get;

#[get(“/hello”)]

async fn greet() -> impl Responder {

HttpResponse::Ok().body(“Hey there”)

}

#[actix_rt::main]

async fn main () -> io::Result<()> {

HttpServer::new(||{

App::new()

.route(“/”,web::get().to(index))

.service(greet)

})

.bind(“0.0.0.0:3000”)?

.run()

.await

}
now cargo run <Enter>
Now check your Pi IP Address in my example 192.168.18.68, and type it in your pi browserin this way: 192.168.18.68:3000 to check your server is up and running. It will give the output great!
Next
Open a browser in your PC and ping your Pi IP address in my example 192.168.18.68:3000
Excellent!
Congratulations! You just setup a local web server on Raspberry Pi (Alternate Pc/Laptop) written in Rust Actix.
Live Demo here : https://youtu.be/jLFUzmAopKw
Explore more IOT information here